
Hei ystävät rakkaat.
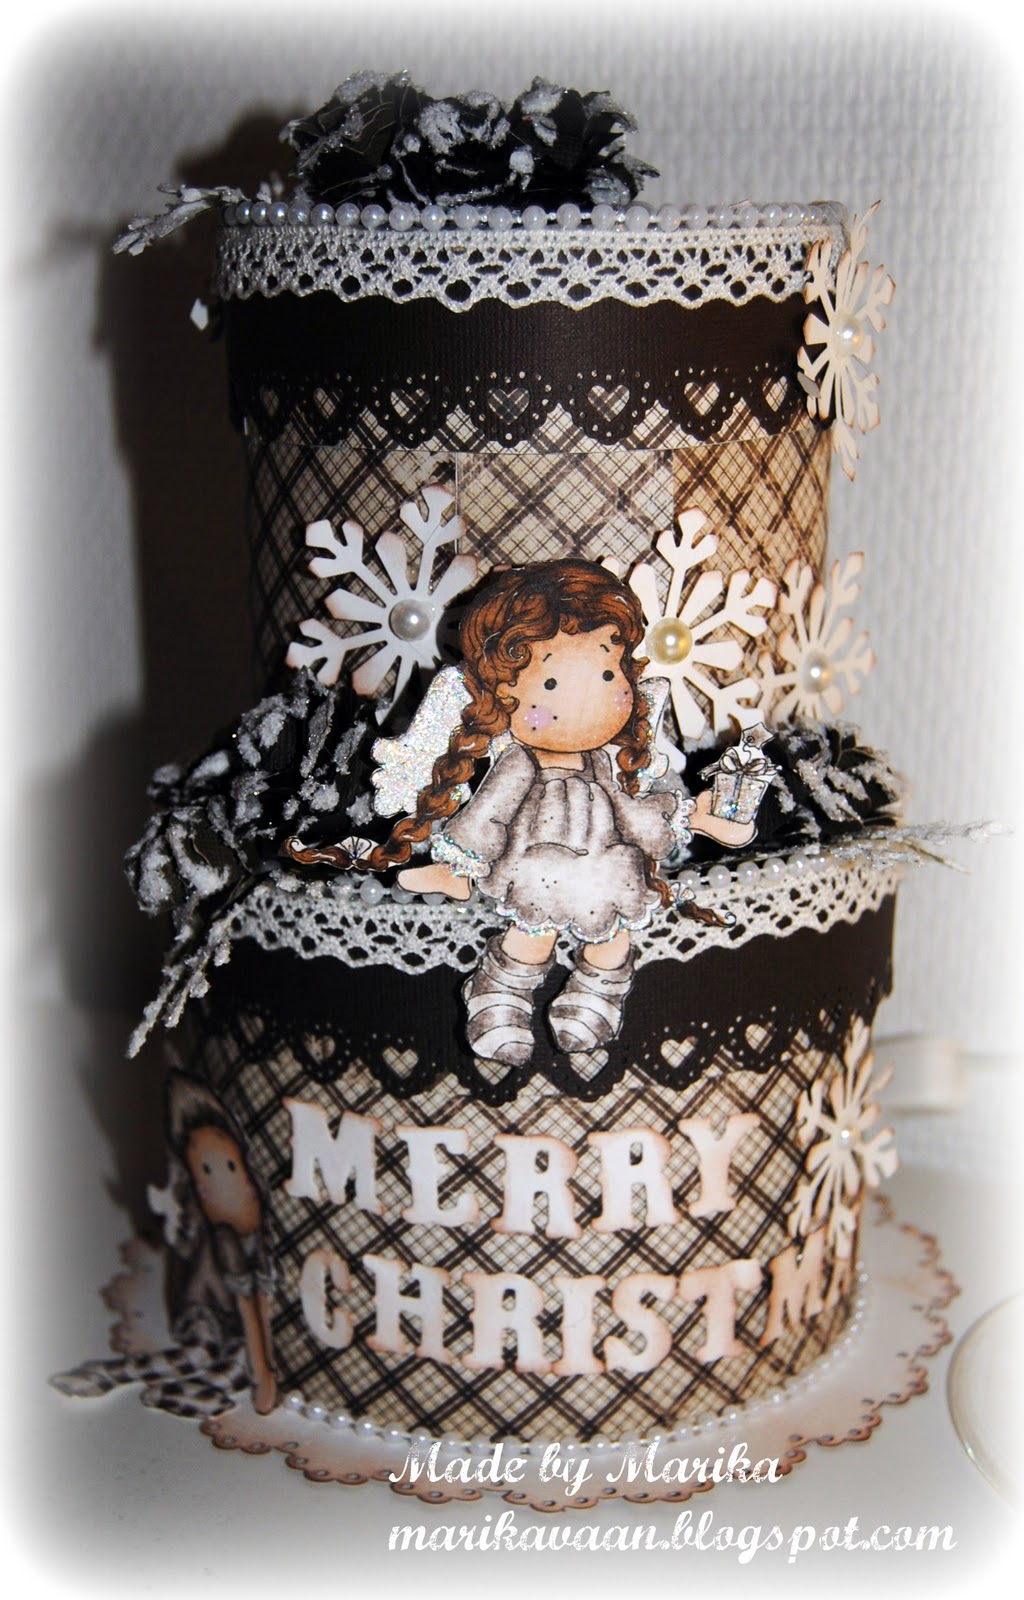
Olen pahoillani mutta olen ollut kovin kiireinen. Kolme pientä tyttöä ja koira..niin ja mies.. työtä riittää. Ajattelin sitten yhdistää joulukalenterin luukut 3-8. Ja tässä se iso luukku tulee. Eli joulukakku. Huh huh.. vihdoinkin se on valmis. Olen tehnyt sitä viikon. Mutta pidän siitä. Maja Design paperit.. ooh rakastan niitä. Ja magnolia leimat, en voisi elää ilman niitä. No okei joka tapauksessa tästä löytyy minun ohjeeni tähän kakkuun. Pohjan tekeminen on helppoa ja koristelu on parasta.
Hello dear friends.
I'm sorry but I have been very busy. Three little girls and a dog and a man .. so .. plenty of work. Then I thought to combine Advent Calendar doors 3-8. And here comes the big door. So, Christmas cake. Wow .. finally it is ready. I've done it for a week. But I like it. Maja Design Paper .. ooh I love them. And the magnolia stamps, I could not live without them. Well, okay anyway here is my advice for this cake. North is easy and decoration is the best.


Osat. Ympyrät :2X isompi halkaisia 13cm ja 2X pienempi jonka halkaisija 10,5cm
Reuna palat: Iso korkeus 12cm ja leveys 46cm
pieni korkeus 12cm ja leveys 37cm
Parts. Circles: 2X bigger diameter and 13cm 2X smaller diameter 10.5 cm
Edge cuts: Great height of 12cm and width 46cm
small height of 12cm and width 37cm

Minulla ei ollut tarpeeksi isoa paperia joten jouduin jatkamaan sitä.
I did not have a big enough paper so I had to continue it.

Tein taitoksen 2cm reunasta. Jolloin kakun osan korkeudeksi jää 10cm.
I did fold the edge of 2cm. When the cake is part of the height of 10cm.

Kaksipuoleinen teippi 2cm leveään reunaan.
Two-sided adhesive tape to the edge 2cm wide.

Teipin suoja osa pois, ja sen jälkeen leikkaan noin 1cm kokoisia osioita koko reunan.
Part of the protective tape off, and then cut about 1cm in size sections of the entire edge.

Kiinnitän palat reunaa myöten limittäin.
I draw pieces along the edge of the overlap.

Reunan liimaan lopuksi kaksipuoleisella teipillä.
Finally, glue the edge of the double sided tape.

Tässä valmiit osat.
This prefabricated parts.

Seuraavaksi valmistan kannet. Muuten samalla lailla kun pohjan mutta teen kannen pohjan päälle, jotta saan siitä sopivan kokoisen. Että kansi on helppoa avata.
Next, prepare the lids. Otherwise, the same way as the bottom but I do cover the base, in order to get it to your size. That the lid is easy to open.

Teen siis kannesta hieman isomman kuin pohja.
So I make the cover a little larger than the bottom.
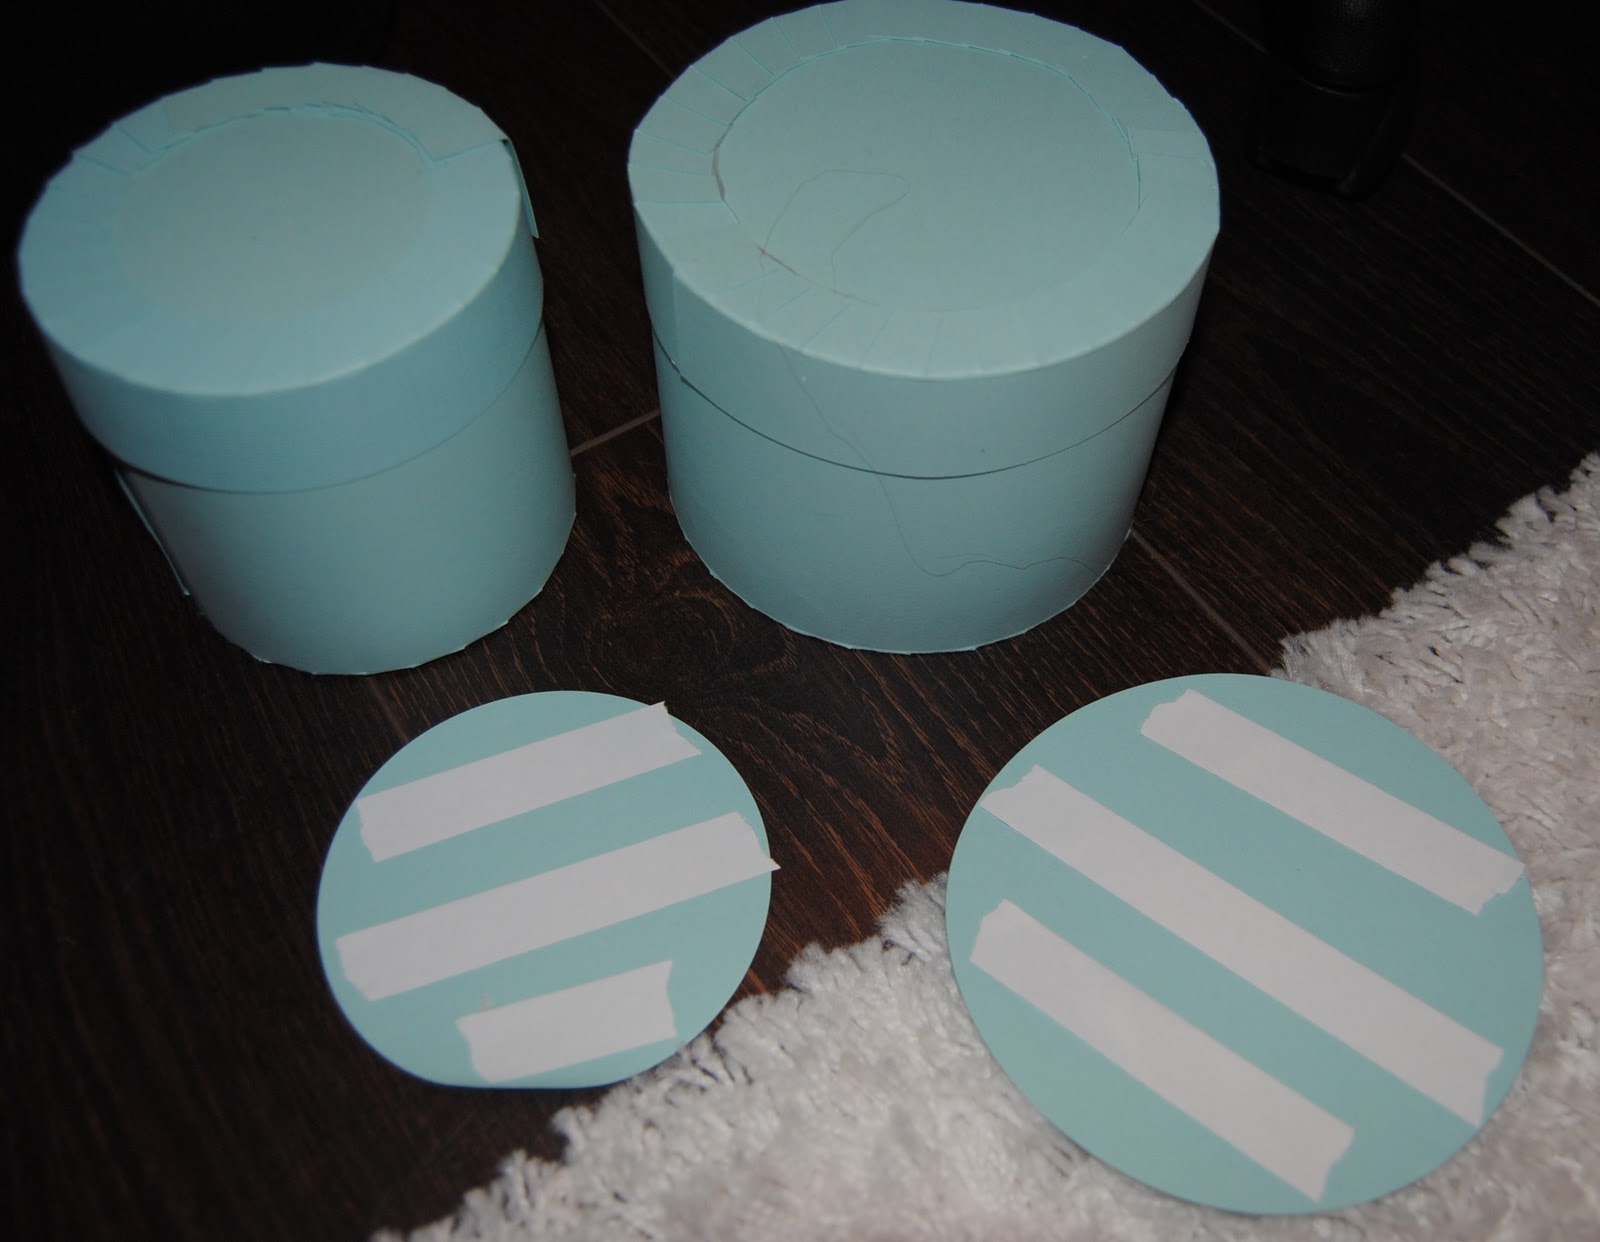
Lopuksi vielä liimaan päälle saman kokoiset ympyrät kuin pohjat.
Finally, glue on top of the circles of the same size as the bottom.

Tässä valmiit osat, ennen koristelua ja yhteen liimaamista. Kakun tekeminen on mukavaa ja sisään voi kätkeä lahjan. Ehkä pian näet mitä minun kakkuni sisällä on:) Rakastan kommentteja joten jos pidät minun kakusta, ole ystävällinen ja kerro se minulle. Ja toivottavasti ohjeesta on iloa jollekkin.
Ihanaa meillä on lunta, halauksin Marika
This prefabricated parts, prior to decoration, and gluing together. Making the cake is nice and can be concealed in a gift. Maybe soon you'll see what I kakkuni inside:) I love comments so if you like my cake, please, and tell it to me. And, hopefully, is a joy to talk to someone.
We have a lovely snow, hugs Marika
Challenges:
Onpas ihana :)
VastaaPoistaKummityttö rakastuis jo pelkkään kuoreen ettei tarttis olla ees ylläriä sisällä..
OMGOSH This is really so so cool, Thanks for including the instructions on how to make it:-) I really love your decoration, thanks so much for sharing it with us at MDUC this week
VastaaPoistaHugs
Karen
xxx
En kestä :-O Huippu upea!
VastaaPoistaKertakaikkiaan ihanan kaakun olet leiponut <3
Terkuin:Tinzu
WOW! So beautiful! Your tutorial is wonderful also!!! I may need to squeeze time in to make this gorgeous project!!!
VastaaPoistaThanks for joining us at the Just Magnolia and Hanglar Stanglar Challenge this week!
Hugs, Dena
Stunning cake!! Truly gorgeous to admire and your tutorial is perfect. Would love to try this. :)
VastaaPoistaLove the color choices you selected for decorating, very much!!
Thank you so much for playing along with us at Top Tip Tuesday!
And remember, if you have a TIP you’d like to share with us crafters, just write it up in your post and then add TIP by your entry name and you’re eligible for the TOP TIPPER PRIZE as well.
Lisa xx
I didn't mean to attach all that to my last message. I assumed your tutorial was your tip. :)
VastaaPoistaWOW!! What an amazing creation!! I love the coloring on Tilda and the embellishments too! SO beautiful! : )
VastaaPoistaThanks for sharing your creativity at the Simon Says Stamp & Show Challenge!!!
-Sarah
For More Opportunities:
*Follow Simon Says Stamp on Twitter
*Like Simon Says Stamp on Facebook
*Subscribe to Simon Says Stamp on YouTube
thanks mandy iamc
VastaaPoistaGorgeous creation, love all the layers and stunning accents....great tutorial as well.. thanks for joining us at Simon Says Challenge blog
VastaaPoistaVoi sentään! Upea kakku ja vielä resepti mukana :o) Miten sä jaksat/ehdit...... itse olen ihan turtana kun yritän vielä viimeisiä joulukortteja kasata. Ehkä täytyisi välillä askarrella jotain muuta...
VastaaPoistaBeautiful decoration!!! Love the little bit of sparkle that you have added to your project..
VastaaPoistaThanks for join us with the fun this week at MDUC.
hugs........
Oh, this is beautiful. Thanks for joining us at MDUC this week.
VastaaPoistaJanne
Fabulous! What a brilliant tutorial too! thanks for sharing this, and thanks for coming to join us at Top Tip Tuesday this time, I hope you can come play again soon, hugs Samantha :0)
VastaaPoistaJust gorgeous! Thank you for joining us at 7 Kids College Fund Challenge! Have a great week.
VastaaPoistaJulie
Just Beautiful! Thanks so much for joining in at Just Magnolia this week
VastaaPoistaHugs Julie P
Gorgeous cake with all the yummy deco. Thank you so much for joining us at Magnolia-licious Challenge :o)
VastaaPoistaHugs,
Cabio
Sorry for commenting so late on this. This is absolutely stunning. I love the colors and your design. Your tutorial is awesome to, thanks and thanks for joining us over at Crafts and Me Challenges.
VastaaPoistaHugs:)
Angela
Onnittelut Crafts&Me top3- valinnasta!!!
VastaaPoistaOnko nuo kakut jotenkin toisissaan kiinni?
VastaaPoistaOn liimattu yhteen.
VastaaPoista